
THE EVER-EVOLVING BUILDING ENVELOPE
A Three Part Series On Flashing, Air Barriers and Stucco
As many of you may be aware, the building code is always evolving. With the release of the 2012 International Code and continuing on in the 2015 code, an interesting change to building envelope requirements became apparent. As those who install exterior cement plaster (commonly known as stucco) know, there has long been a requirement for the equivalent of two layers of 60 minute, Grade D paper-over-wood sheathing when installing stucco.
While this is the same in the 2012 code, there is a significant change in how the flashings integrate with the layers of Water-Resistive Barrier (WRB), sometimes referred to as a weather-resistant barrier or building paper. For decades we have installed flashings to drain over the outermost layer of paper, and now the code is indicating that the flashings should drain between the layers.
What Caused This Change?
In many parts of the country, builders have started using a housewrap (plastic rolled sheeting designed to resist air and liquid water, while allowing some passage of water vapor) as the WRB since housewraps also serve as an air barrier. It is our understanding that this application as an air barrier has largely driven the code revision. In order to understand the code change we must understand how an air barrier works and how this impacts the flashing application. Part two of The Ever-Evolving Building Envelope Series will focus on Air Barrier Fundamentals and will soon be delivered straight to your inbox.
Without going into a lengthy discussion, suffice it to say, the flashings need to be sealed to the air barrier for the air barrier to be complete. Therein lies the question: is there a way to seal the air barrier at the penetrations and still have the flashings drain over the outermost layer?
To discuss this, we will first look at some typical flashing details.
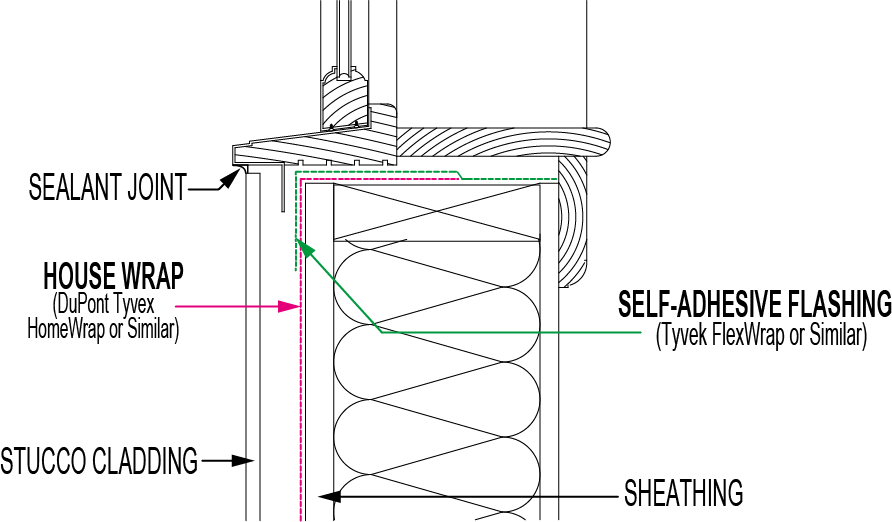
Manufacturers like DuPont™ Tyvek® have self-adhesive flashings to assist in creating a seal at the penetrating items. We will look at typical housewrap window installation details with particular attention to the sill flashing detail.
Notice how the self-adhesive flashing is installed over, and sealed, to the housewrap below the window. This is required to make the air barrier complete and continuous over the building envelope.
Now, let’s look at a traditional, double-layer paper integration at a window sill with self-adhesive flashing.
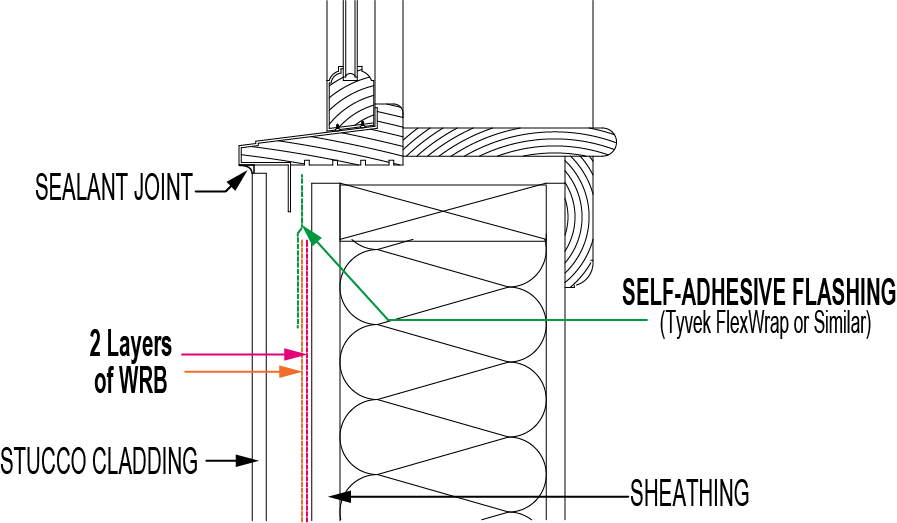
As you can see, the flashing seals only to the outer layer of WRB, which poses a problem for air barrier installations, as an air leak can occur at the sill of the window.
As you can see, the flashing seals only to the outer layer of WRB, which poses a problem for air barrier installations, as an air leak can occur at the sill of the window.
This raises the question: how do you get two layers of WRB behind the self-adhesive sill flashing and still keep the continuity of the air barrier intact?
According to some, the answer is: You don't.
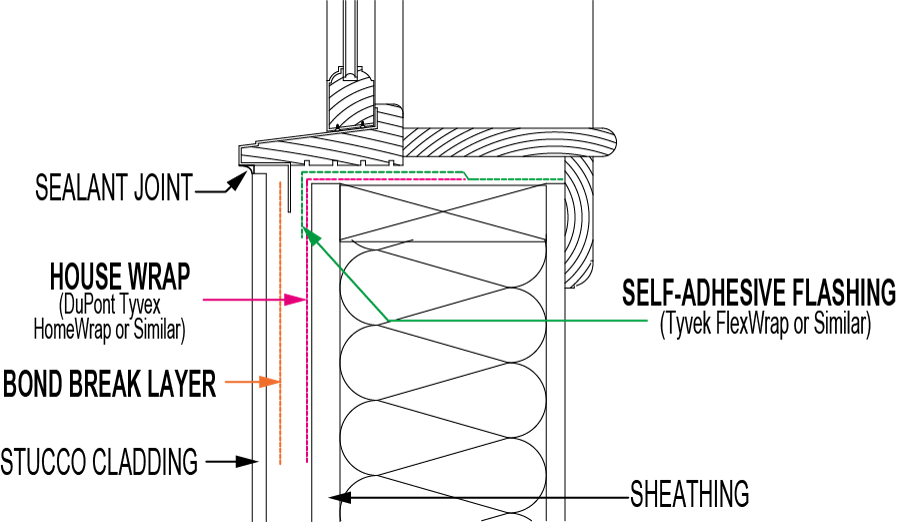
Instead, you keep the air barrier intact and place the second layer over the entire air barrier with the flashings draining between the layers. That is what the code is prescribing as indicated in the detail below.
The detail below illustrates the new flashing installation per the 2012 code:
Are There Potential Issues/Risk Associated With This Practice?
Theoretically speaking, there may not be any problems. If the innermost layer of WRB is installed continuously over the exterior walls and sealed to all penetrations, with all incidental holes, rips and tears repaired, it should perform as intended. However, based on our inspection experience, it is rare to find a WRB that does not have some holes, rips or tears at the time of inspection. Proper installation of the WRB and integration with flashing is critical in order to reduce potential entry points for water (and air) that could migrate into the structure. The major concern is that this damage could go unnoticed until a leak occurs.
To date we have not seen many installations following this new method except for one-coat stucco with foam as the bond break layer. The foam covers the building paper, preventing a final inspection prior to the cladding application. In fact, in many cases, the foam is being installed as the WRB is being installed, inhibiting inspection of the WRB all together. For more information on one-coat stucco issues see our June 2014 Tech Alert for Two Problems with Every 1-Coat Installation.
On top of the accidental holes, we have pulled back the outer layer to discover a lack of sealant at penetrations, and other errors that were covered by the outermost layer prior to our inspection. Additionally, unless the outermost layer meets the code requirements in the exception to the two layers over sheathing, you still need to integrate a second layer between the water drainage plane and the sheathing to protect the sheathing.
This leads us to the question: is there an alternative method that still provides the continuous air barrier, and meets the manufacturer’s installation requirements while still draining the flashings on the outermost layer?
The answer to this question is: Yes there is!
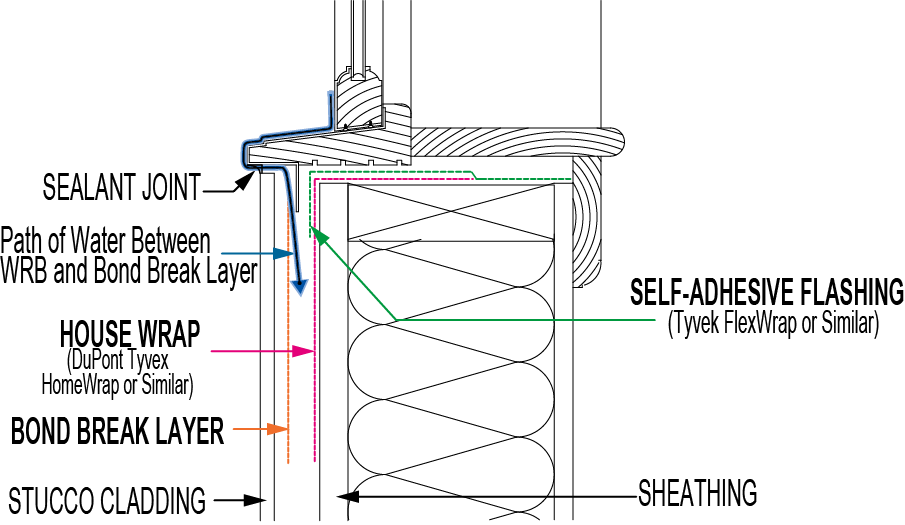
To illustrate this, we will use information from a DuPont™ Tyvek® recessed window detail that we have modified for a flush installation below:
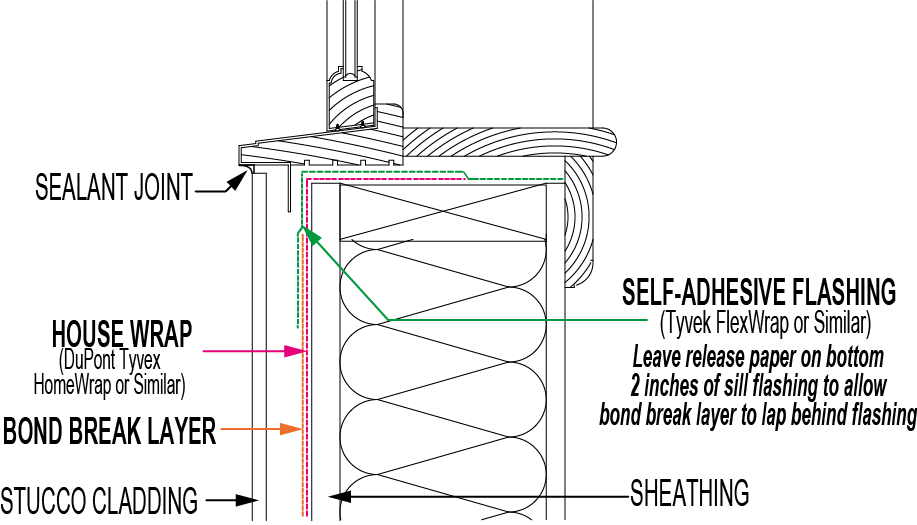
This detail effectively seals the flashing to the air barrier while still allowing the bibbing of the second (outermost) layer in a weatherboard manner. This method could be worked out by leaving a strip of release paper along the lower edge of the sill flashing to allow the paper to lap up behind. Other methods may be worked out as well that would meet both requirements.
Due to issues related to the application of stucco over housewraps, many building envelope experts including Quality Built, recommend a bond break layer over housewraps. This means that your result will be two layers, not just where the stucco is applied over sheathing, but everywhere the stucco is applied over the housewrap. This idea of a bond breaker is another reason that some feel water should be directed between the bond breaker and the WRB. After all, they say “the outer layer is not a WRB, only a bond breaker.”
However, at Quality Built, we would encourage any water infiltrating pass the cladding to be directed back to the exterior at every opportunity. Additionally, from an inspection standpoint, this bond breaker still creates problems with verifying that the WRB hidden by it is indeed continuous and sealed to prevent water intrusion at the time of cladding installation. The third and final part of this series will provide more detailed information on the installation of stucco over DuPont™ Tyvek® HomeWrap®.
What About The Code Requirements?
The code will generally defer to the manufacturer’s recommendations, as the manufacturer will have liability related to their product and the code will not. Additionally, the code indicates in Section 1403.2 Exception 2 that “compliance with the means of drainage…shall not be required for an exterior wall envelope that has been demonstrated through testing to resist wind driven rain.” The test standard being referenced is ASTM E 331 (Standard Test Method for Water Penetration of Exterior Windows, Skylights, Doors, and Curtain Walls by Uniform Static Air Pressure Difference).
This exception and test can be used in the event that the local authority having jurisdiction (AHJ) raises the flashing installation as an issue or code violation. While the AHJ can force the issue, the builder must decide what risk they find acceptable and how to mitigate risk that is unacceptable. Some builders will make the change to the new installation per the code without realizing the risk associated with this new method.
While we cannot tell you to do things differently than the code and would not want to cause conflict between you and the AHJ, we do want you to be aware of the potential risk associated with this flashing method and some of the possible alternatives.
Quality Built Recommendations
At Quality Built we would recommend that you consult with an expert prior to making changes on how you construct your building envelope. We also recommend that a Technical Plan Review™ (TPR) be performed that will include a review of your weather-resistive barrier details.
Quality Built's typical TPR includes a review of your design documents based on our years of construction defect, forensic and quality assurance inspection experience to identify details which are weak and/or in conflict with codes, manufacturer’s specifications, industry standards or best practices. Our detailed comments on non-compliant items and alternate design options help improve constructability, minimize liability and eliminate costly errors.
We further recommend quality assurance inspections of the building envelope assembly to ensure that any water that has infiltrated past the cladding back is redirected to the exterior at every opportunity. Leaving water behind the cladding and on the WRB increases the risk that it will infiltrate past the WRB and cause damage to building components.
ABOUT THE AUTHOR

You can reach Jeff at [email protected]