
A weather-resistive barrier (WRB) has been used in home building for over 100 years. Starting in the early 1900s, a rosin paper was used as an exterior layer to seal cracks and seams in exterior framing boards used in home construction. Asphalt-impregnated paper became more common as a weather-resistive barrier in the 1930s and 1940s. The energy crisis of the 1970s is what brought about house wrap to make our homes and buildings more “air-tight” and thus reduced energy consumption used for heating and cooling. Today there are also sheathing products with a factory applied weather barrier available. Weather barrier seams can be taped to create an air barrier.
Weather-resistive barriers are specified to serve two barrier functions. These functions are either a water-resistive barrier or an air barrier. A water-resistive barrier is defined as “a material behind an exterior wall covering that is intended to resist water that has penetrated behind the exterior covering from further intruding into the exterior wall assembly (IRC 2015).” An air barrier or air retarder is defined as “a material or system in building construction that is designed and installed to reduce air leakage either into or through the opaque wall (ASTM 2000).” House wraps are often evaluated against ICC-ES Acceptance Criteria AC38 (ICC-ES 2004).1
Many builders install the weather-resistive barrier with the goal that the barrier serves as both a water-resistive barrier as well as an air barrier. A continuous and properly sealed building envelope is required to be successful in meeting this goal. Windows, doors and other exterior wall penetrations are often sealed and integrated into the house wrap. Air leakage through the ceiling and ceiling penetrations must be addressed, as significant air leakage can occur at this location. Use of sealants or gasketed fixtures can minimize air leakage at ceiling penetrations.
An issue that is commonly seen with house wrap installation is the improper treatment of the house wrap at the rim-joist/exterior wall sheathing and foundation interface. In summary, the entire building envelope must be sealed if the intent is for the house wrap or other weather-resistive barrier to serve as an air barrier. Specifically, the following locations of the building envelope must be addressed:
- All WRB seams including the framed wall-to-foundation interface seam are sealed and overlapped properly.
- Ceilings and ceiling penetrations such as can lights, vents are completely sealed.
- Windows and doors are properly integrated into the house wrap or other weather barrier product.
- All wall penetrations plumbing, mechanical, electrical, and low voltage are flashed and sealed and properly integrated into the house wrap or other weather barrier product.
How important is sealing the exterior framed wall to foundation interface? Dave Wolf, a research and development project leader at Owens Corning, completed a study2 which determined which cracks and holes result in the greatest air loss in home construction. Wolf tested several mockup building assemblies in a 1,400 square foot Owens Corning test house using blower door testing. All joints in the home were selectively sealed and/or unsealed to measure their contribution to overall air leakage of the house.
Wolf concluded that the five most important areas for builders to focus their air-sealing efforts were:
- Cracks at recessed can lights in the top-floor ceiling.
- Cracks between duct boots in the top-floor ceiling and the ceiling drywall.
- Cracks between the top plates of top-floor partitions and partition drywall.
- Leakage through walls separating a house from an attached garage.
- Cracks in the rim-joist area.
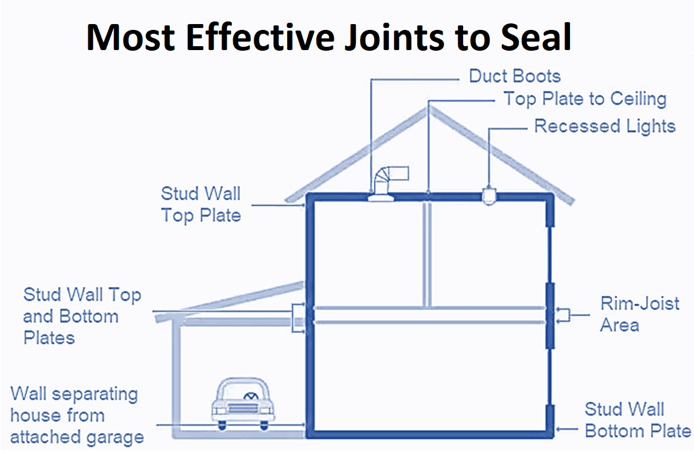
Exhibit 1
An analysis of this data by Martin Holladay3 , editor of Green Building Advisor.com, indicated that sealing the rim-joist area is of even greater importance than those indicated by Wolf’s results. Holladay states, “Since leakage was measured (in Wolf’s testing) by a blower door, the reported results exaggerate the importance of leaks near the neutral pressure plane and didn’t properly evaluate the way the stack effect (see following discussion on the stack effect) disproportionately depressurizes the lowest areas of a house and pressurizes the highest areas of a house. In spite of this fact, four out of five of the highlighted areas are either down low (the rim-joist) or up high (recessed cans, ceiling duct boots, and top plate cracks). My conclusion: these leakage areas are even more important than this research indicates. So be sure to seal these areas!”
As hot air rises during heating periods and as cold air sinks during cooling periods, a home can act like a chimney.4 This effect is referred to as the “stack effect.” Large volumes of air can move through a building envelope with wind pressures on the exterior of the home. When a home is heated, the less dense warm air will rise up and out of the building through open windows, ventilation openings, or unintentional holes in ceilings, such as light fixtures and recessed lights. The rising air reduces the pressure in the base of the home, drawing cold air in through open doors or windows, or unsealed cracks and gaps in building components. The reverse of this rising air effect can occur during cooling periods when hot outside air can push cooler indoor air down from the ceiling and out of unsealed cracks and doors and windows in the lower level of a home. The stack effect is not as significant during cooling periods. Typically during cooling periods, the pressure created is only about 1.5 pascals per story in height versus 4 pascals per story of height in heating periods.4 Exhibit 2 shows a diagram of the stack effect in winter and summer. A pascal is an international unit of measure used to measure pressure which in this case is used to measure air pressure in the home. A pascal is equal to approximately 0.000145 pounds per square inch of pressure (one newton per square meter).
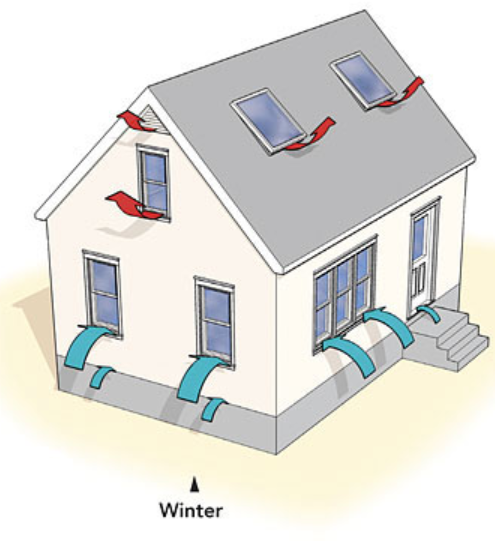
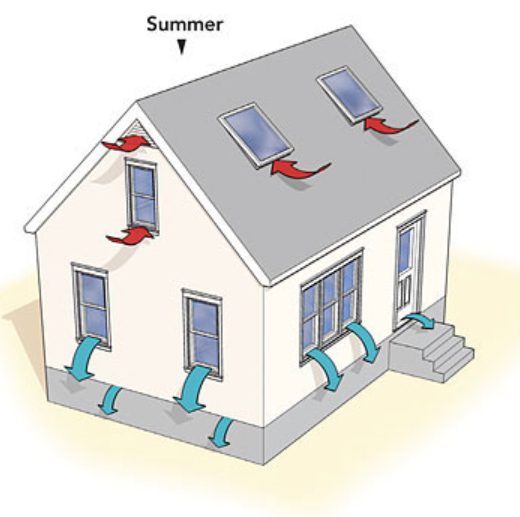
Exhibit 2
A study by Pesce and Gilg5 in 1998 shows that sealing the rim joist area of a home can result in a significant improvement (almost 25 percent in this study) in air leakage in a home based on blower door tests. This study was based on production-built homes in Virginia and Maryland. Four different builders were included in this testing. The homes compared in this test had vinyl siding and three-ply kraft sheathing. Table 1 below shows results from this study.
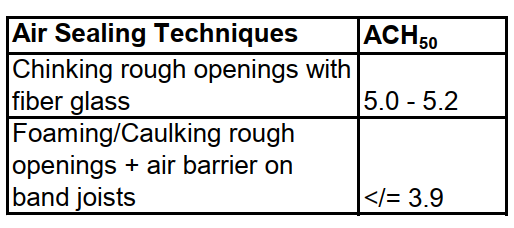
Table 1
Note that in Table 1 above ACH50 refers to complete air exchange in the house with a 50-pascal negative pressure exerted on the house with a blower door test. An ACH50 rating of 5 means a home would have 5 complete air exchanges in an hour if a negative pressure of 50 pascals is imposed in testing.
Manufacturers of house wraps and sheathing with factory-applied weather barriers recommend the sealing of this seam between the exterior framed wall and the foundation if the intent is to use the house wrap as an air barrier. Quality Built recommends overlapping the house wrap onto the foundation by at least two inches even if the house wrap is being used only as a water-resistive barrier. Manufacturers of house wrap recommend from 1 to 4 inches with 2 inches being the most common foundation overlap recommended. If the house wrap is not extended beyond the exterior wall framing, moisture damage to framing material can be significant. A properly installed house wrap can perform as an air barrier, will protect wood and metal framing members, and prevent insect/rodent entrance into the home. Table 2 below summarizes some building wrap manufacturers recommendations for house wrap installation procedures at the rim joist area.
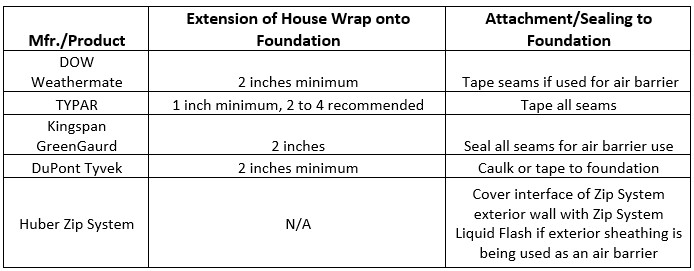
Table 2
Exhibit 3 below shows photos of house wrap that has been extended properly onto the foundation wall and sealed to the foundation wall with caulk.
House Wrap Properly Extended and Adhered to
Foundation at Slab on Grade w/ Stem Wall Foundation
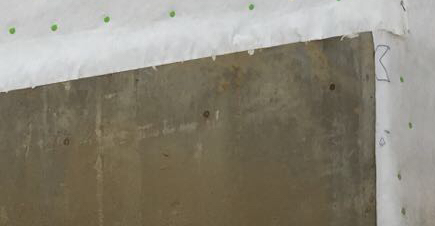
Exhibit 3
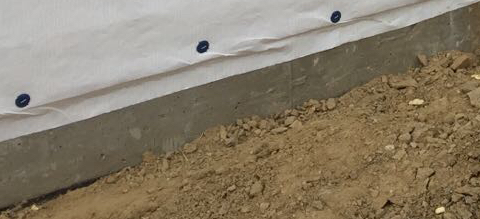
Step Down in Foundation Wall with The House Wrap
Properly Overlapping and Adhered to The Foundation
Exhibit 4
Note that in Exhibit 4 sheathing with a factory-applied weather barrier is sealed to the foundation with flashing tape. Manufacturer’s preferred method for sealing sheathing to foundation for this WRB product is with the use of a manufacturer’s liquid flashing product (caulking tube application).
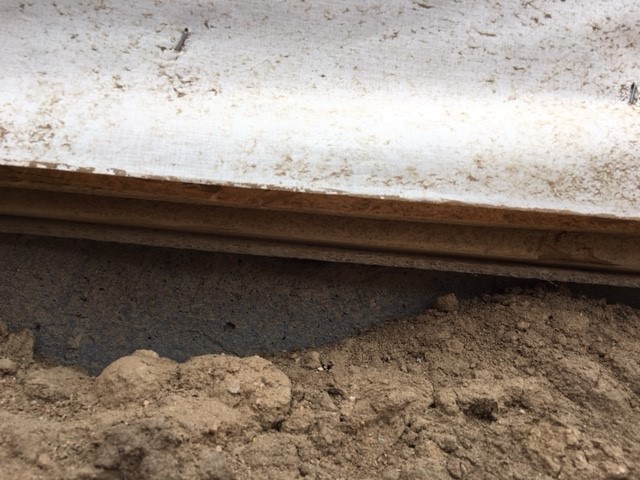
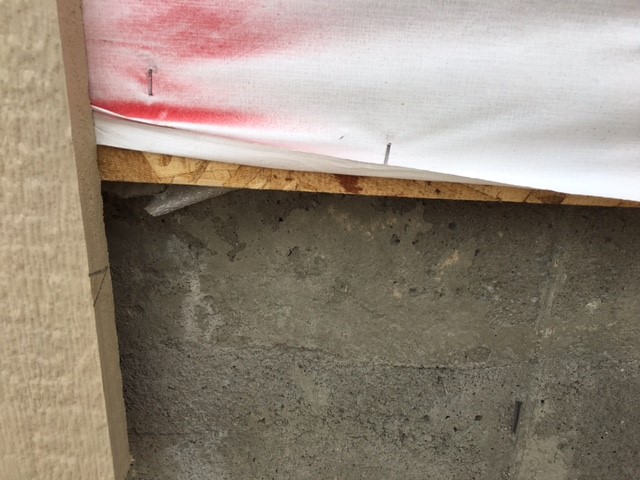
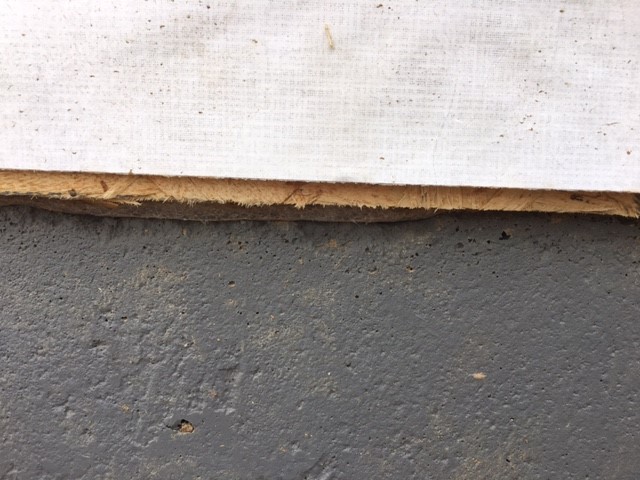
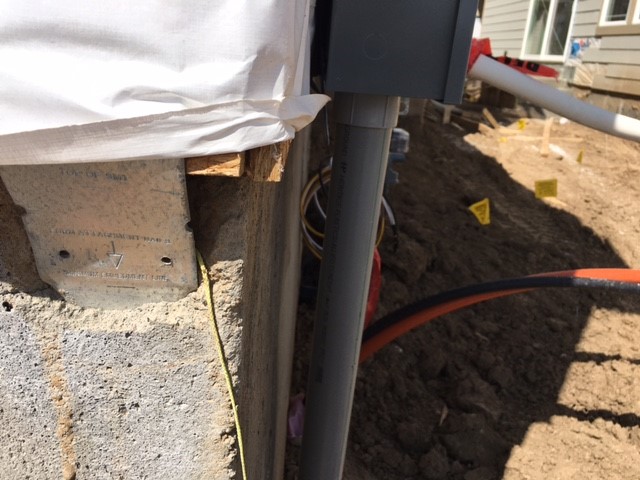
Observations at production home builder sites have shown inconsistencies in how house wrap at the exterior wall and foundation wall interface is terminated. Exhibit 5 below shows photographs of improperly installed house wrap.
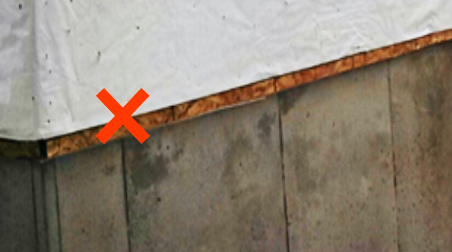
Not a Good Effort. Exterior Air Seal Not Provided by the House Wrap.
Missed It By This Much. Exterior Air Seal Not Provided by the House Wrap.
Somewhat Common Fold in Bottom of the House Wrap at Building
Corner Exposing Sheathing. Exterior Air Seal is Not Provided at This Location.
Almost, But Not Quite, In This Case. House Wrap Should Extend to Foundation Wall and Be Fastened.
Final House Wrap Product for This Home with Sheathing
and Hardware Exposed and No Exterior Air Seal
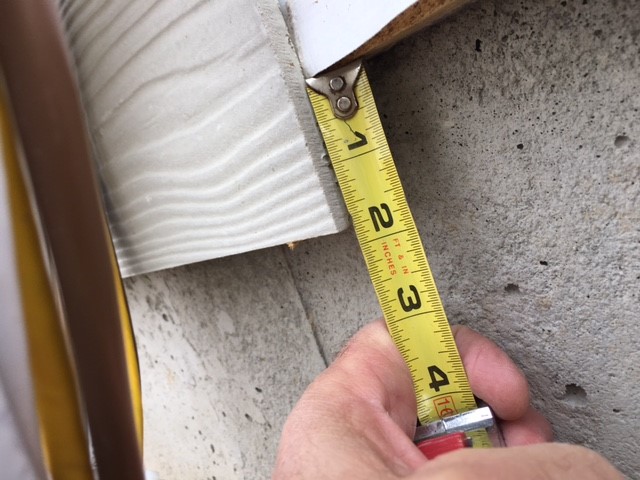
Exhibit 5
House Wrap Should Extend 2 inches Below Sheathing/Sill Plate and Be Fastened to Foundation.
Siding/Cladding Can Be Extended to Cover House Wrap.
Siding/Cladding Support Can Be Provided with Metal Flashing Products.
House wrap is often not sealed to the foundation even on homes where the house wrap is meant to serve as an air barrier. Most often it is terminated close to the bottom of the exterior wall sheathing. Recent observations at one production home building site showed one home with the termination of the house wrap one to two inches below the sill plate and not sealed to the foundation, another with the house wrap terminated about a 1/4 to 1/2 inch above the sill plate, and a third with the house wrap terminated about even with the bottom of the sill plate. Exhibit 5 shows some typical installations of house wraps near the sill plate location on single family homes that are improperly installed.
Not sealing the seam at the interface of the exterior wall to the foundation results in about 25 percent of the house wrap seams not being sealed on a typical one-story home. Insulation systems and other building components can provide air barriers. However, penetrations and incomplete installations of these components in the wall cavities can minimize their effectiveness.
House wrap manufacturers provide details to show termination of house wrap at the foundation when the house wrap is being used as an air barrier. The foundation and/or the exterior sheathing panel may need to be primed to assure adherence of caulking and/or tape when fastening house wrap. Sealing of WRB seams should be avoided in moist environmental conditions as sealants can fail to adhere properly. Sealants and tapes should be installed in the proper environmental conditions where adhesion can be assured.
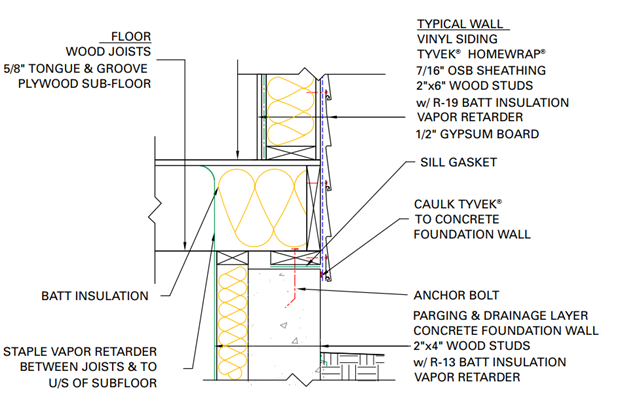
Exhibit 6
Exhibit 6 Shows Sill Overlap and Attachment of House
Wrap to the Foundation Wall for a Home With Lap Siding
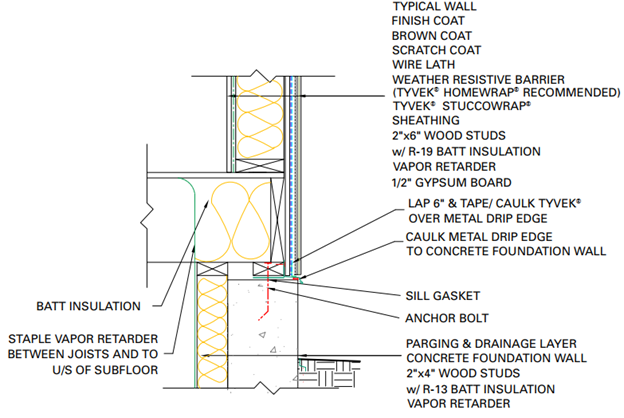
Exhibit 7
Exhibit 7 Shows House Wrap Termination for Three-Coat Stucco Cladding
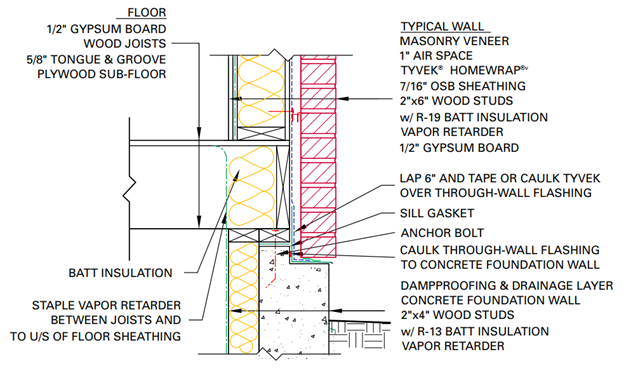
Exhibit 8
Exhibit 8 Shows House Wrap Termination for Masonry Veneer Cladding
Not sealing the seam at the interface of the exterior wall to the foundation results in about 25 percent of the house wrap seams not being sealed on a typical one-story home. Insulation systems and other building components can provide air barriers. However, penetrations and incomplete installations of these components in the wall cavities can minimize their effectiveness.
Conclusion
House wraps and sheathing with a factory-applied weather barrier can be installed as a water-resistive barrier only or, as both a water-resistive barrier and an air barrier. Observations of house wrap installations and sheathing with a factory applied weather barrier indicate that often when these products are being applied the seam at that interface between the foundation and the exterior sheathing/rim-joist is not properly installed. Most house wrap manufacturers and Quality Built recommend that the wrap extends a minimum of 2 inches below the sill plate. If the house wrap is being used as an air barrier, then it needs to be sealed to the foundation. Air loss at the rim joist area or, framed wall and foundation interface, of a home can be substantial and studies have shown that this is one of the most important areas of the building envelope to properly seal. Sealing this house wrap seam can result in not only a more airtight home, but it can also provide a home where the wall components are more protected from the elements and minimize insect infiltration into the home. A well-designed ventilation system should always be provided in homes with an air barrier system to assure good indoor air quality. An airtight home will save energy costs and provide a more comfortable living environment.
A Technical Plan ReviewTM performed on your design documents using published best building practices will identify details which are deficient and/or in conflict with codes or manufacturer’s specifications. House wrap and cladding details should be included in the plans to assure proper installation. Checkpoints should be provided in inspection templates to ensure proper construction of entire weather barrier assemblies including assurance there is proper interface of the weather barrier to the foundation, exterior wall penetrations, and window and door openings.
TECH ALERT - MAJOR CONTRIBUTOR

Frank Yellico, Field Consultant - Level 4
Frank Yellico has a bachelor's degree in Civil Engineering and has been involved in the construction industry for over 30 years. His areas of expertise include AAMA/ASTM testing standards for air and water infiltration of windows and doors, building code compliance, building materials standards, building plan reviews, and construction defect mitigation. At Quality Built, Frank’s responsibilities include; performing forensic investigations, property condition assessments, technical plan reviews, and field inspections. Frank is experienced with the mechanics involved in mid to high-rise residential buildings, townhomes, condominiums, and single family homes. You can reach Frank at: [email protected].
References
1Weston, Theresa A. (2006). A Review of Housewrap Performance and Its Implications for Energy
Savings. ACEEE Summer Study on Energy Efficiency in Buildings.
Retrieved from https://aceee.org/files/proceedings/2006/data/papers/SS06_Panel1_Paper28.pdf
2Wolf, Dave (2013). 5 Penetrations That Provide the Most Bang for Your Air-Sealing Buck. Builder
Magazine 080/4/2013.
3Holladay, Martin (2013). Musings of an Energy Nerd. Green Building Advisor. Retrieved from
http://www.greenbuildingadvisor.com/blogs/dept/musings/getting-biggest-bang-your-air-sealing-
buck
4Morrison, Dan (2015). The Stack Effect: When Buildings Act Like Chimneys. Fine Homebuilding.com.
Green Building Advisor. Retrieved at http://www.greenbuildingadvisor.com/stack-effect-when-
buildings-act-chimneys
5Pesce, Matthew M., and Geoffrey J. Gilg (1998). “Typical Envelope and Duct Leakages in Newly
Constructed MEC-Compliant Homes.” Thermal Performance of the Exterior Envelopes of Buildings
VII.
IRC (2015) International Code Council, International Residential Code.
[ASTM] American Society for Testing and Materials.