
By: Patrick C. McPherson
Field Operations and Risk Assessment Manager
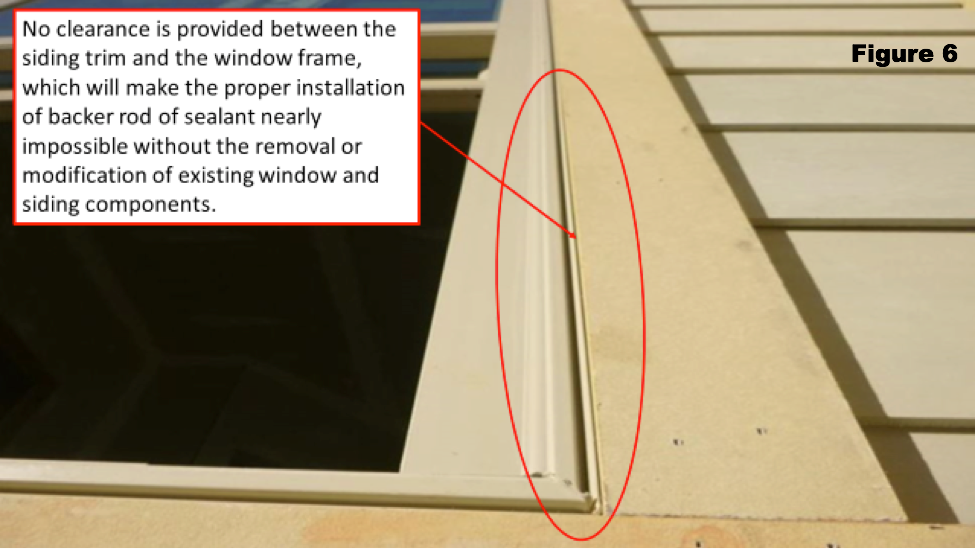
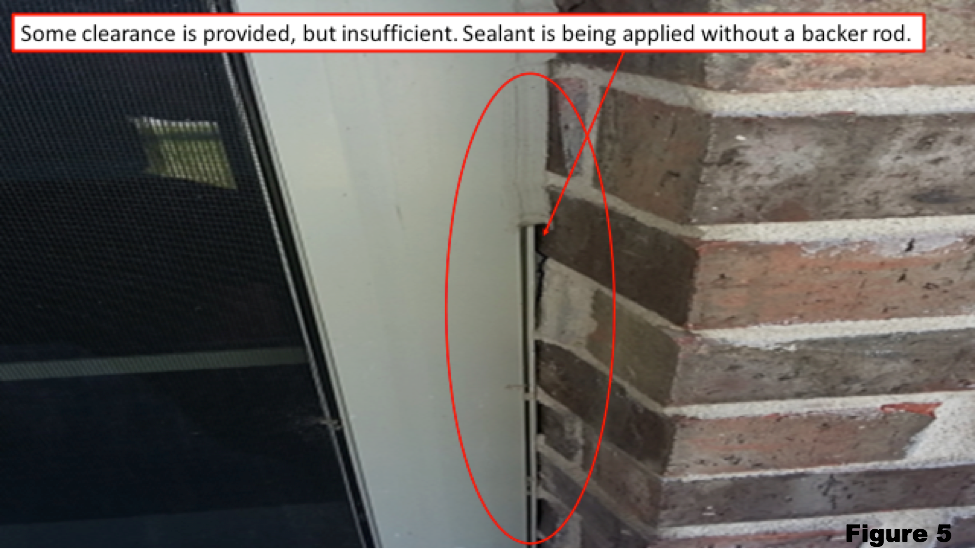
Quality Built provides Quality Assurance and Risk Assessments to builders of all sizes across the United States. While most trends are regional there are some that reach national status. Let’s see if you can identify the anomaly presented in each of the three figures below:
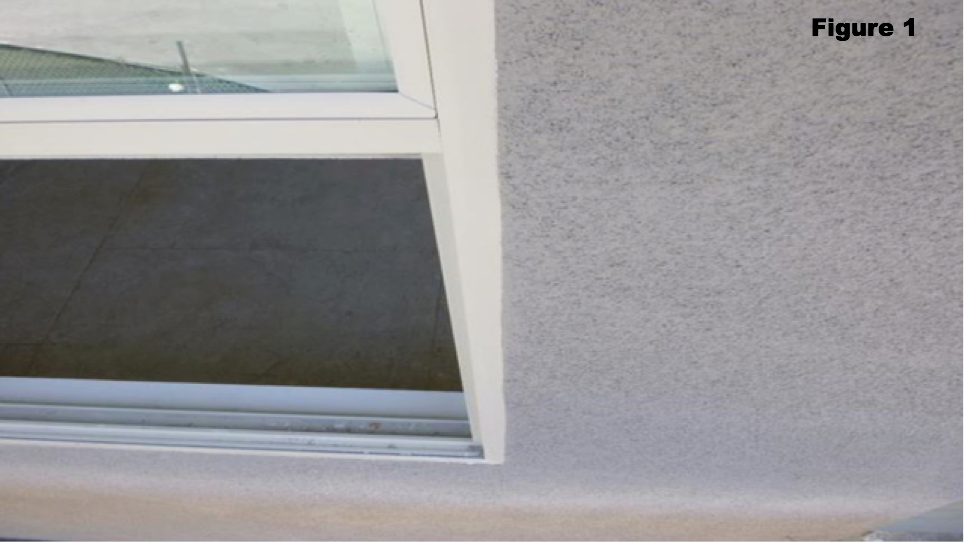
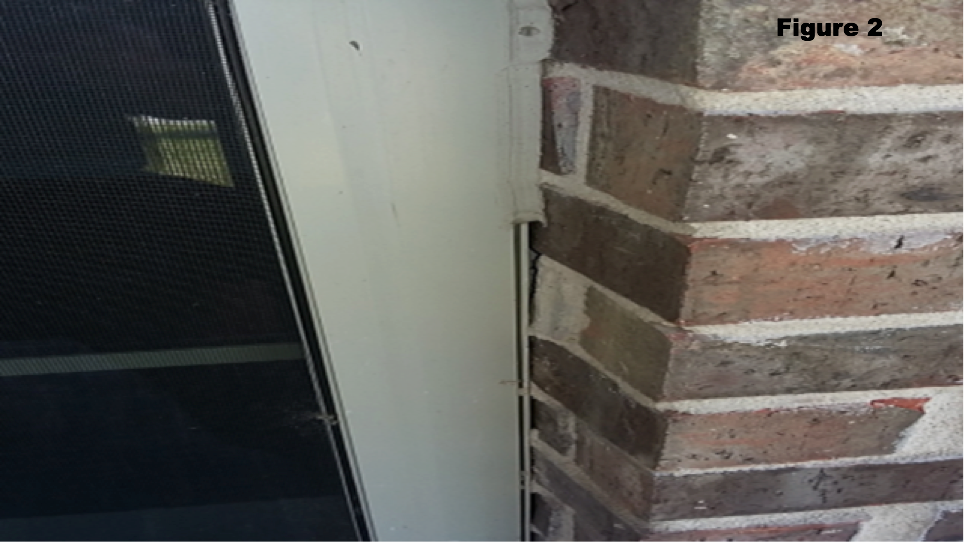
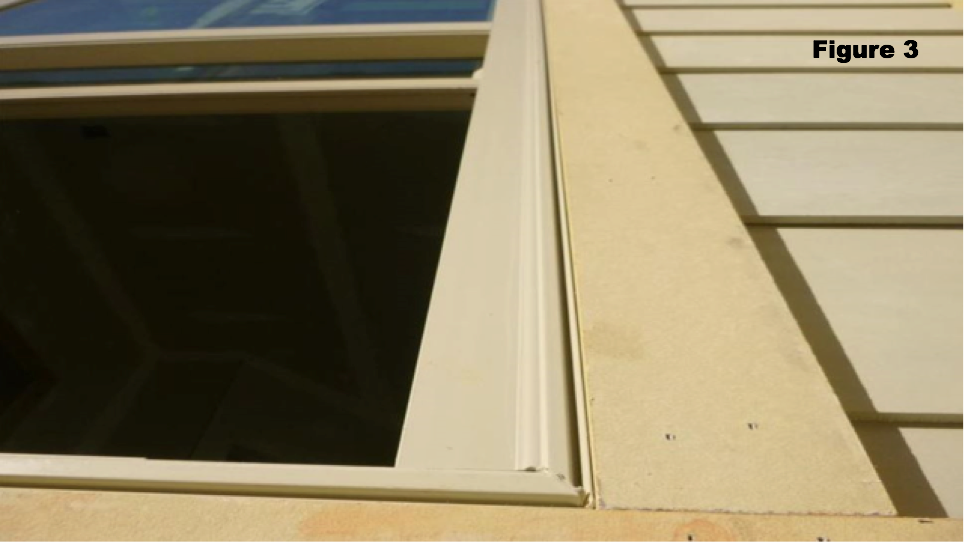
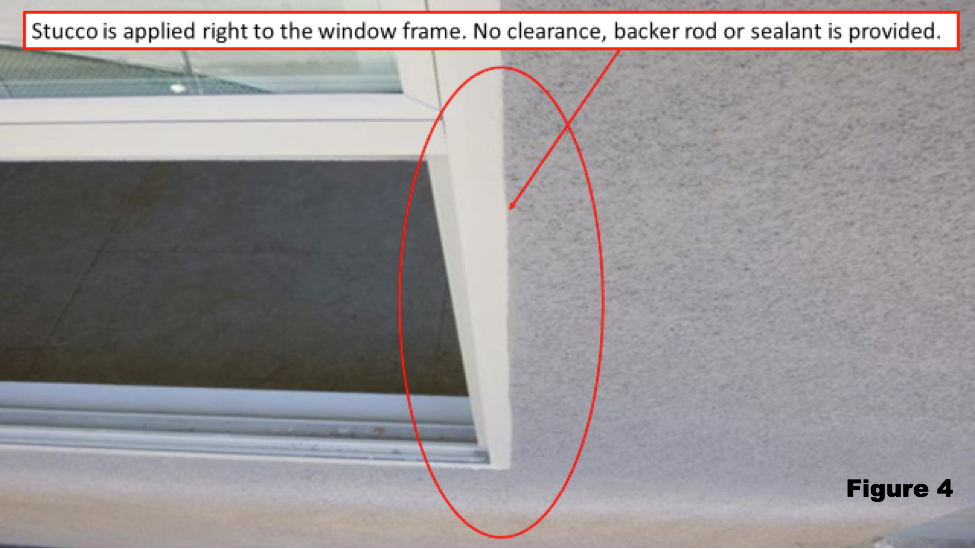
If not, don’t feel too bad. The fact is that this is commonly missed throughout the country. The common anomaly in each of these images is the lack of clearance and sealant between the window frame and the exterior wall cladding (e.g. stucco, siding, brick/stone).
According to the installation instructions from several major window manufacturers, the recommendations of the American Architectural Manufacturers Association (AAMA) and the American Society of Testing and Materials (ASTM), maintaining sufficient clearance and a proper seal between the window frame and cladding is an important step in the window installation process; however, inspection data from builders all over the country, maintaining sufficient clearance and a proper seal between the window frame and cladding is an important indicate this is a, yet commonly missed practice.The American Architectural Manufacturers Association (AAMA*) and the American Society of Testing and Materials (ASTM**) conduct controlled material testing and provide technical guidance for the installation of windows in published installation recommendations.
For those that don’t know, AAMA is a trade association for fenestration (windows, doors, skylights, curtain walls, etc.) manufacturers and suppliers. According to ASTM’s website, they are a not-for-profit organization that provides a forum for the development and publication of voluntary consensus standards for materials, products, systems, and services. Both organizations test materials and are widely regarded as setting the industry standard for the installation of fenestrations in new construction. If you haven’t heard of AAMA or ASTM, then take a look at the window installation instructions, which are often printed on the back of the tag stuck in the window, or read through the window manufacturer’s warranty. Chances are AAMA and ASTM are referenced there.
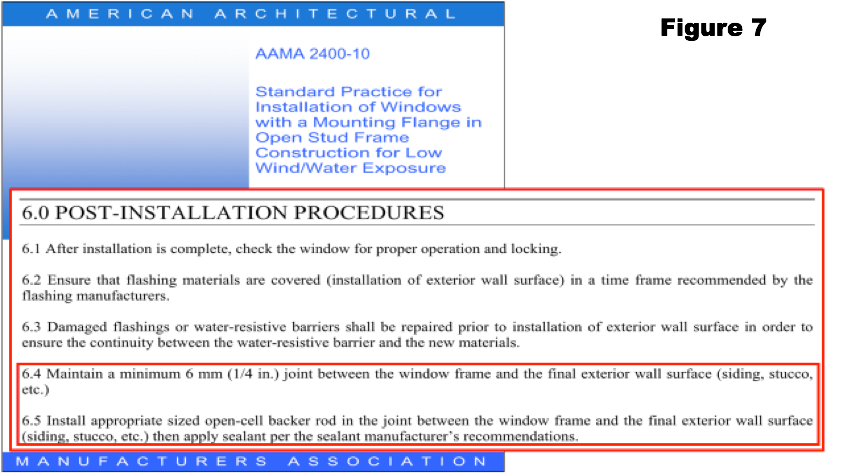
AAMA and ASTM provide technical guidance for the installation of windows in published installation recommendations. Published recommendations are regularly revised to reflect changes to installation practices based on testing and performance of windows and installations. AAMA’s published installation recommendations for surface-mounted windows with a mounting flange (the most common type windows installed in single family residential, low-rise and light commercial construction. See figures 1- 3 above.) are detailed in AAMA 2400-10, Standard Practice for Installation of Windows with a Mounting Flange in Open Stud Frame Construction for Low Wind/Water Exposure. Sections 6.4 and 6.5 very plainly and explicitly recommend that a minimum ¼-inch joint be maintained between the outside of the window frame and the final exterior wall surface (siding, stucco, etc.). (See figure 7 below).
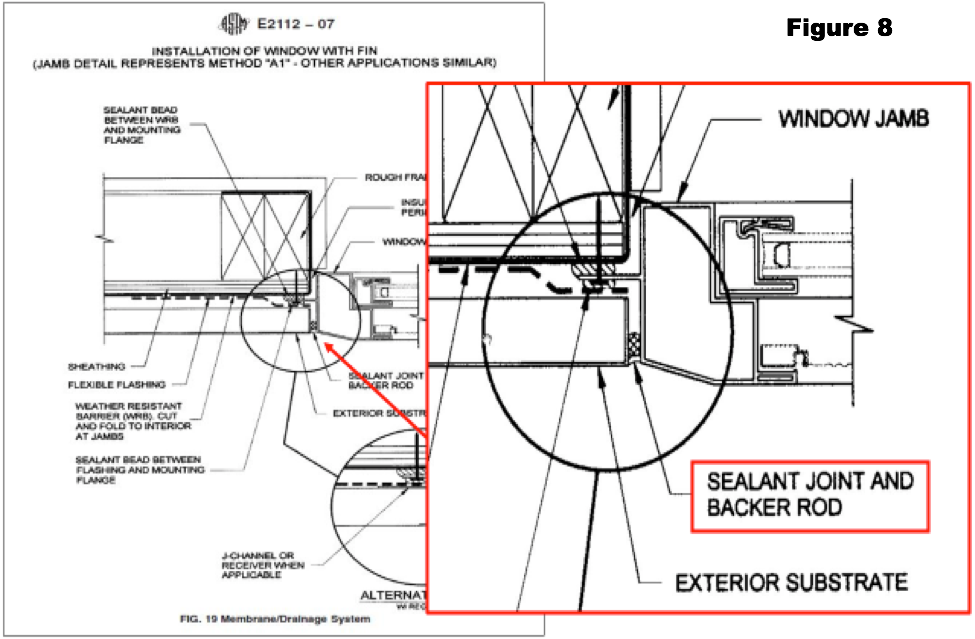
ASTM addresses clearance for similar windows in ASTM E2112, Standard Practice for Installation of Exterior Windows, Doors and Skylights, and publishes a new revision every few years. ASTM E2112 does not provide much detail on how to seal between window frames and exterior cladding, except to recommend a sealant joint and backer rod be installed in accordance with the window and sealant manufacturers’ installation instructions (See figures 8 and 9 below).
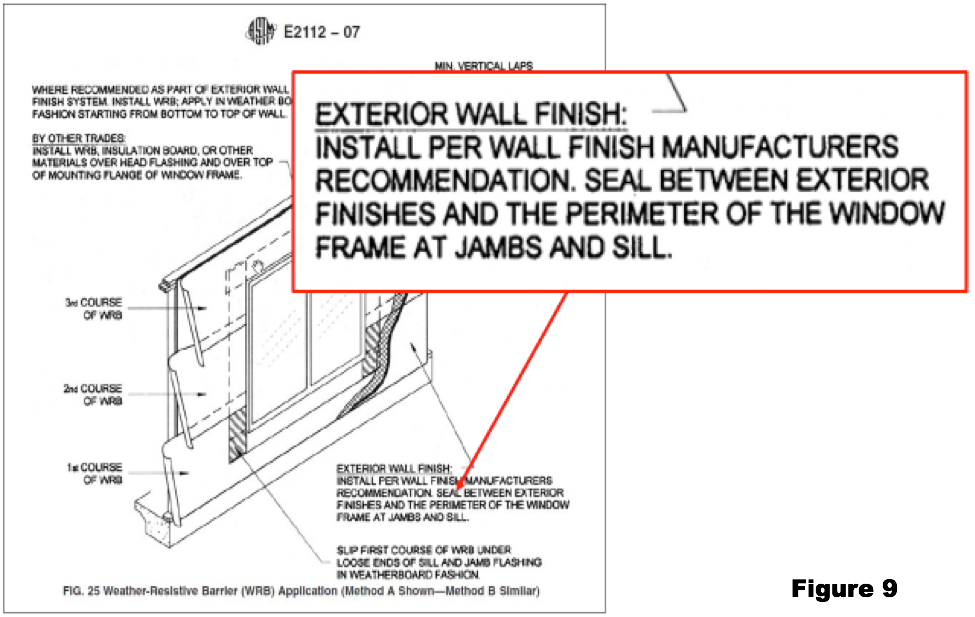
Many sealants will require a backer rod to maintain the shape of the sealant. To determine the appropriate sealant and applications, the builder or designer should refer to ASTM C1193, Guide for Use of Joint Sealants, and AAMA 851-09, Fenestration Sealants Guide for Windows, Window Walls and Curtain Walls.A proper sealant joint around the window frame serves multiple functions:
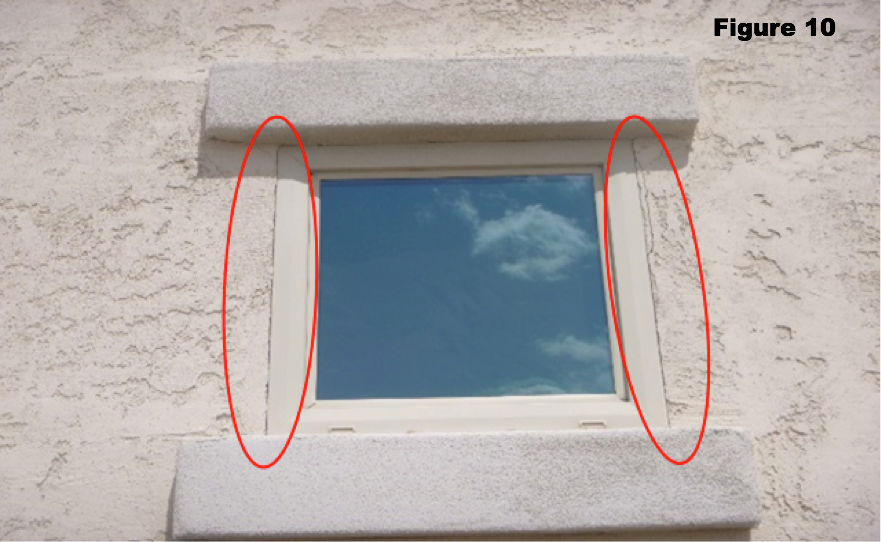
The flexible sealant joint creates a waterproof seal between the window and cladding to prevent water from passing through the void to the water-resistive barrier (WRB) unabated. As you can see in figure 10 above, the stucco has begun to separate from the perimeter of the window frame, creating a void. While any moisture bypassing the cladding will still have a WRB to contend with before reaching sheathing or the wall cavity, the best way to reduce the risk of water intrusion into the structure is to limit the potential for moisture to reach the WRB by properly sealing the cladding system to penetrations.
Additionally, it provides a flexible joint between cladding and the window, which will help prevent damage to the materials during the normal expansion and contraction of components. Depending on the cladding type and the rate of expansion of materials, windows may become bound by the cladding material, preventing the window’s expansion, which may affect window operation and can even damage frames. Cladding too may be damaged during the expansion of the window if sufficient clearance and seal is not provided. This damage can create a secondary opening for water intrusion which will only compound the issues over time.
Section 7 of ASTM E2112 discusses water shedding strategies of wall and roof systems, in which they breakdown wall and roof systems into two general categories—Surface Barrier Systems (e.g. Exterior Insulation and Finish System (EIFS), concrete wall panels, etc.) and Membrane/Drainage Systems (e.g. stucco, siding, veneers, anchored brick, etc.). Surface Barrier Systems rely on the continuous seal of windows, doors and other exterior wall penetrations to cladding to prevent the intrusion of water into wall cavities, which is often referred to as “face sealing”. Due to the sole dependence on a continuous sealant joint around wall penetrations, many types of Surface Barrier Systems are associated with significant risk of water intrusion and are not recommended for use.Membrane/Drainage Systems are characterized by the presence of an underlying water-resistive barrier (WRB) (e.g. building paper, housewrap, etc.) between the exterior wall cladding and wall framing. Most cladding systems in low-rise residential construction are Membrane/Drainage Systems. The WRB is integrated with and sealed to flashed wall penetrations in a shingle-fashion to facilitate the proper drainage of moisture down the WRB and away from the structure. While the underlying building paper or housewrap material function as the primary WRB in a Membrane/Drainage System, exterior cladding is generally designed and installed to resist and drain bulk moisture and is the first line of defense against water intrusion. Vinyl and fiber cement lap siding, for example, are installed with overlaps in a shingle-fashion and sealed or flashed at joints and terminations to allow bulk water to stay on top of the finish wall surface and drain down and away from the structure. Stucco does not resist moisture in quite the same way as siding. Due to the cementitious nature of stucco, stucco will absorb moisture, saturating the cladding and dry-out over time. In the cases of both siding and stucco, the exterior surface materials are designed to prevent the unabated flow of moisture to the WRB and to allow incidental moisture reaching the WRB to drain.
It is important to understand that while AAMA and ASTM standards are widely considered best practices and industry standards, they are still only recommendations. The window manufacturer’s installation guidelines define the specific requirements for the installation of their product, but as mentioned in the beginning of this alert, many window manufacturers directly reference AAMA and ASTM installation recommendations in installation instructions and warranties.
With so many products and manufacturers out there, it is difficult to come up with a single detail or ‘one-size fits all’ approach to window installation procedures. In performing risk assessments of new construction all over the country, our assessors first look to the architectural plans and general notes for specific details on installation of windows. Often, window installation details only specify window fastening and flashing and offer little to no guidance on how to complete sealing around windows after the installation of cladding. When the architectural plans provide no detail or specification for sealing between windows and cladding, assessors then turn to the window manufacturer’s installation instructions to determine the installation requirements. Some manufacturers provide details and explicitly call for clearance, a backer rod and sealant in the installation instructions. Some simply reference AAMA and ASTM standards. And some window manufacturers make no mention of perimeter sealant joints at all. The cladding and sealant manufacturers may also specify clearance and sealing requirements. Given such variation in installation requirements from manufacturer to manufacturer, it is imperative that builders and trade contractors know the products that are being installed and their specific installation requirements. The builder and architect should ensure that window installation design is comprehensive; covering all aspects of the installation—rough opening size, sealing, fastening, flashing and sealing to cladding. Window defects and failures resulting from poor installation practices have been one of the most common problems for builders over the years, so thoughtful and thorough design is essential to ensure long term performance and prevent field installers from determining how windows should be installed. Failure to comply with manufacturer’s installation guidelines may result in water intrusion and impaired window operation and may void product warranties, which increases the builder’s liability.
Quality Built Recommendations include:
Have a Technical Peer Plan Review performed on your design documents or published best building practices to identify details that are weak and/or in conflict with notes or manufacturer’s specifications. Include checkpoints specific to clearances and flexible sealant joints to ensure proper installation and appropriate materials are being used at the job site. Verify that all products are compatible with each other for integration and chemical compatibility.
ABOUT THE AUTHOR
 Patrick C. McPherson
Field Operations and Risk Assessment Manager
Patrick McPherson is a Field Operations Manager and National Manager of Risk Assessment Services for Quality Built. Patrick is a certified builder inspector.
Patrick began his tenure with Quality Built seven years ago as a Field Consultant and Risk Assessment Specialist. During his time at Quality Built, Patrick has performed quality assurance observations, risk assessments and property condition assessments on thousands of homes in hundreds of projects throughout the United States. Through Risk Assessments, Patrick is able to establish baseline quality metrics for builders across the nation or within specific geographic locations. The data gathered during Risk Assessments allows Quality Built to share the best building practices observed across the nation, which raises the standard of quality for all.
You can reach Patrick at: [email protected]
Quality Built's Commitment
Quality Built is committed to being a visionary leader in the insurance, financial and construction industry by providing reliable and innovative Third Party Quality Assurance Services to our clients and by providing those services in the most professional and efficient manner utilizing cutting-edge technology, proprietary software and employees who maintain the highest level of integrity and expertise.
Contact Quality Built today at 800-547-5125 or email: [email protected]