
Those “Beautiful” Icicles – Preventing Ice Dams
January 13, 2021 in Tech Alert
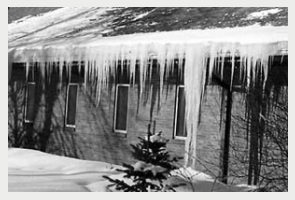
Every year, ice dams cause millions of dollars of damage to residential roofs1. Ice dams form when melted snow refreezes, primarily at roof edges. The icicles we often admire in wintertime are a result of ice dam formation, and can actually lead to extensive damage. Here we outline the factors that cause ice dams and uncover methods to prevent damage to buildings.
How Ice Dams Form
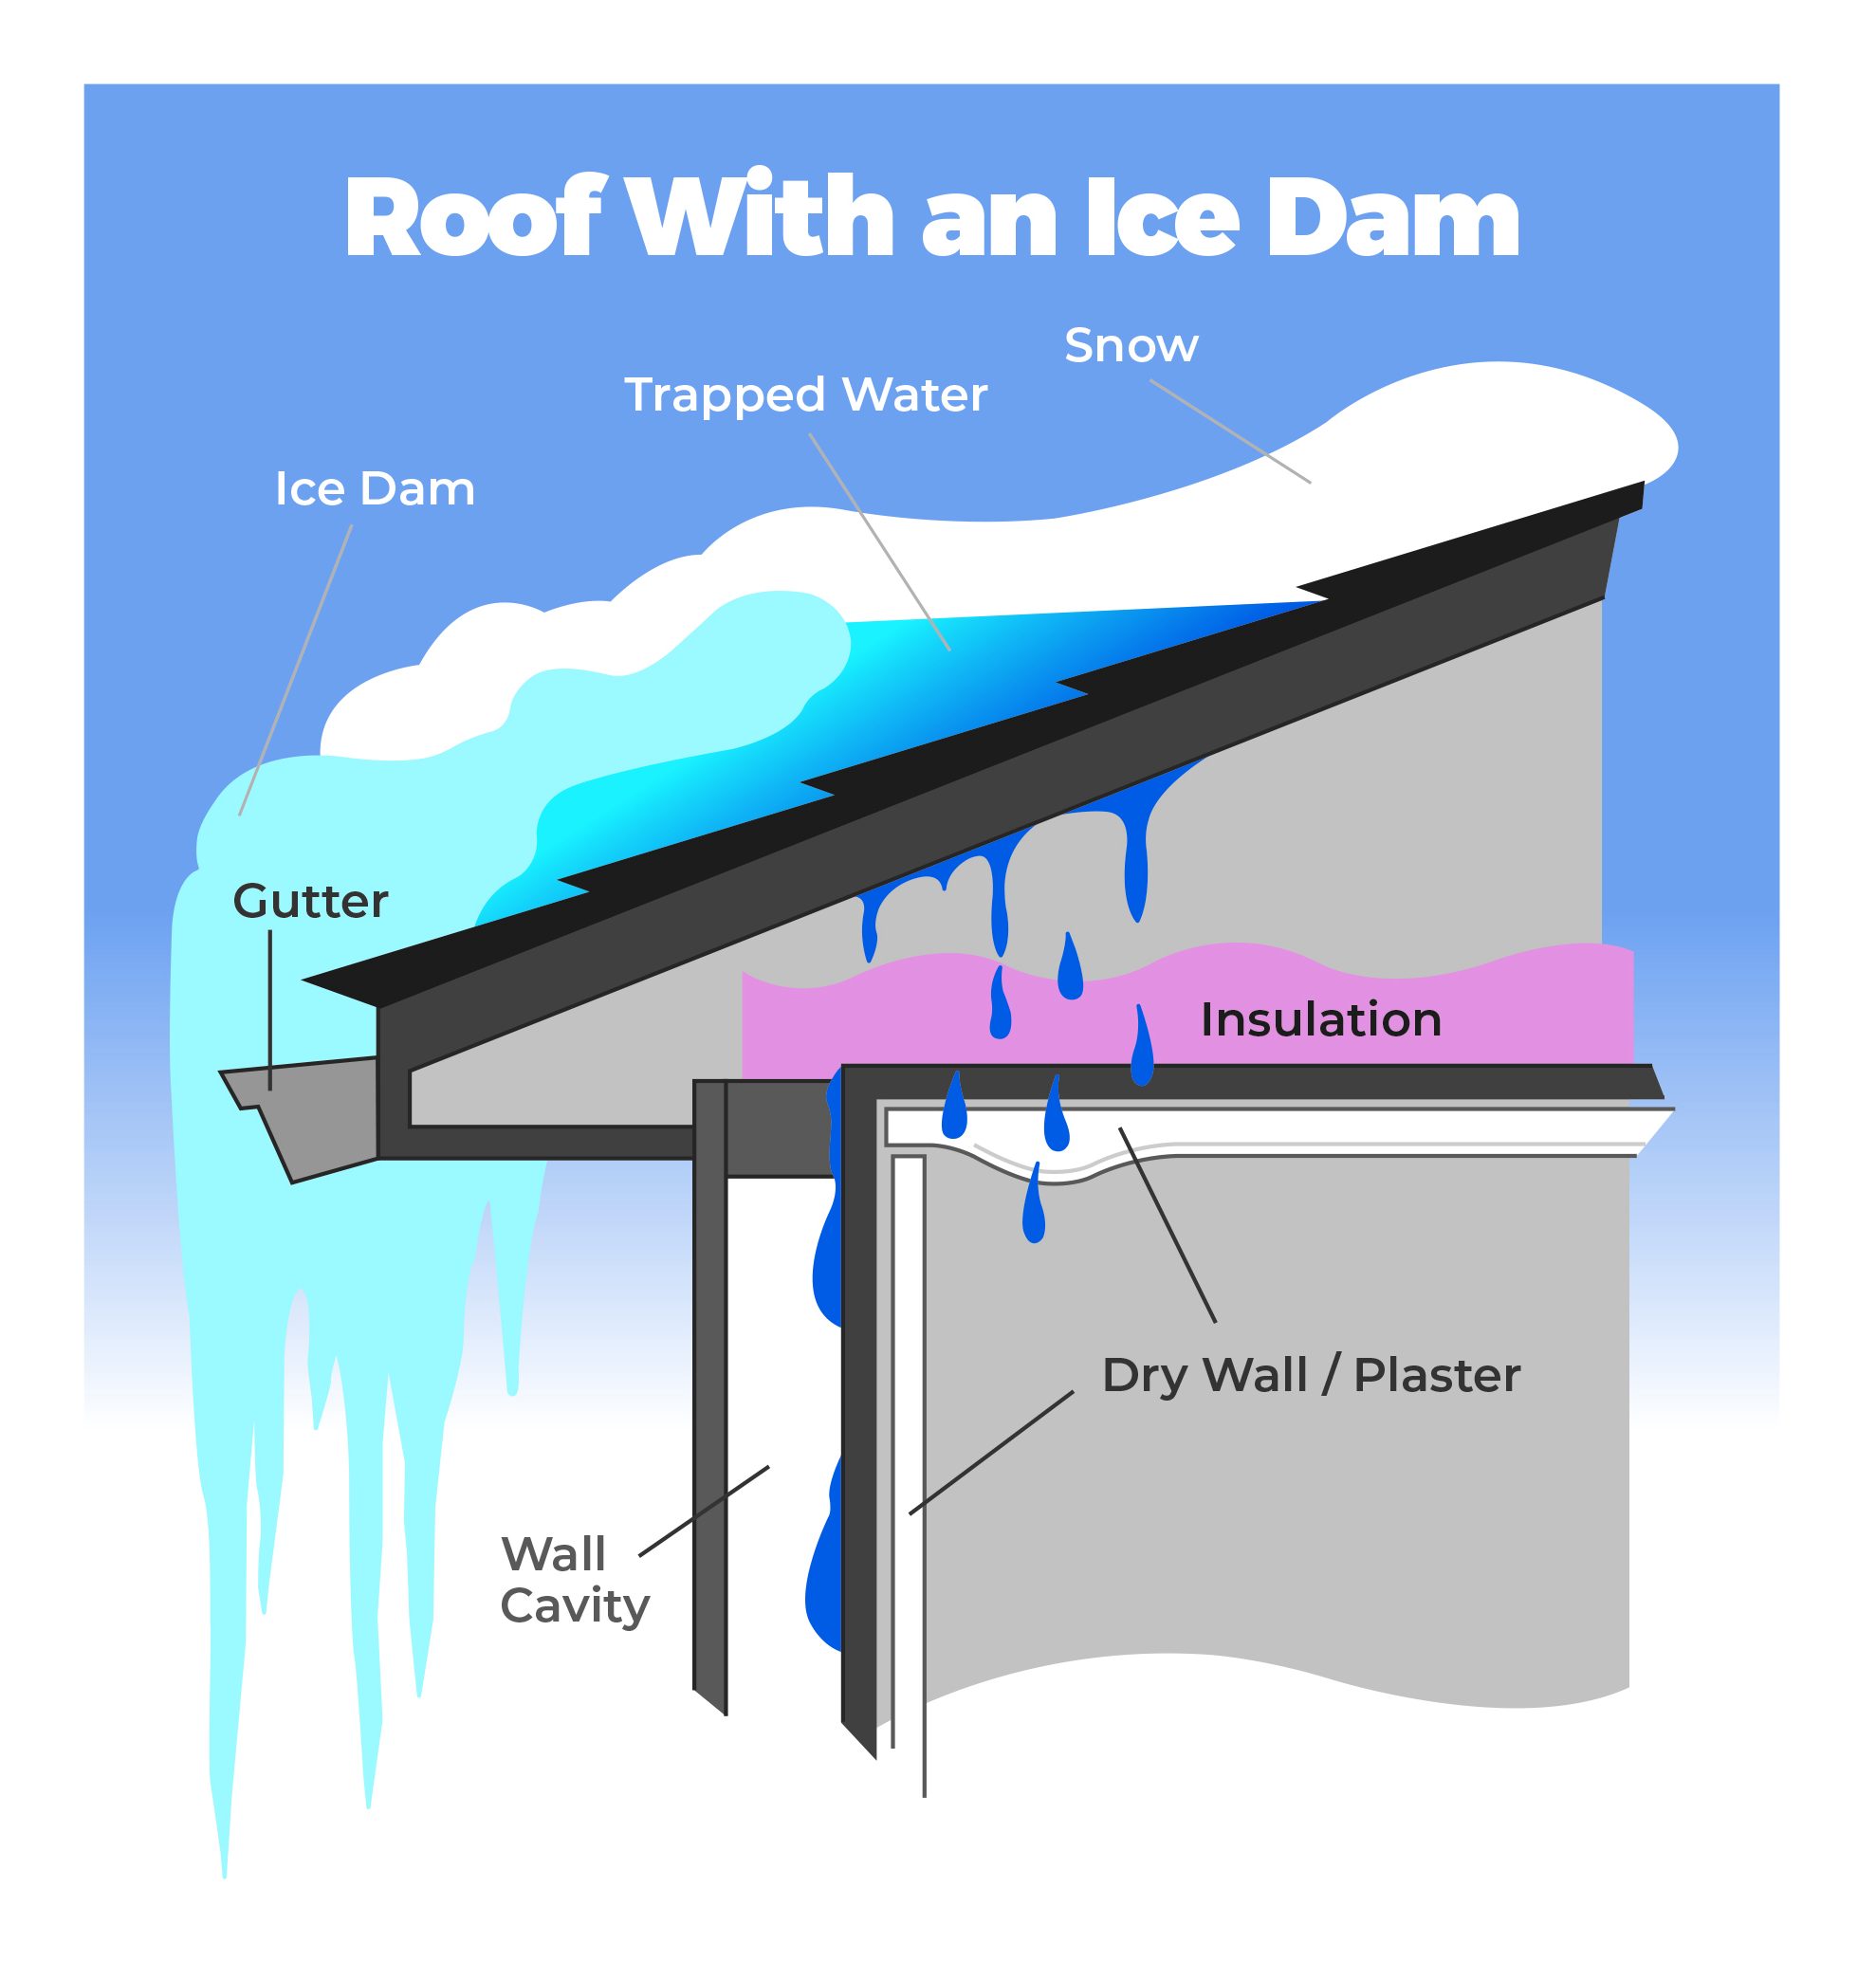
An ice dam is the result of snow melting and refreezing, creating ice buildup at eaves or other cold areas of the roof. You’ll often see them on sloped, shingled roofs. Pooled snow meltwater finds cracks and openings in the roofing system. From there it can flow into the attic, resulting in damage to the insulation, the home’s interior surfaces, or the exterior wall system. While in some instances solar heat gain may cause temperature differences on the roof, ice dam issues primarily result from heat loss from the home2. Faulty attic insulation, improperly sealed penetrations, and poor attic ventilation are the primary contributors of heat loss.
Ice dams typically occur on areas of the roof that are most exposed to the elements, but they can also form from heat loss at wood framing members, electrical penetrations, vent penetrations, etc. Gutters do not cause ice dams, but they can concentrate ice and water at the eave area and cause additional damage. Detached buildings with unconditioned space do not typically have ice dam formation, as they lack a heat source to create the nonuniform temperatures on the roof surface.
Preventing the Formation of Ice Dams
Houses that are built to maintain a below-freezing roof temperature during cold weather can prevent the formation of ice dams. A home with good attic insulation (R-38 in northern U.S. locations)1, has sealed penetrations between the living space and attic space, and has good attic ventilation can maintain the roof surface at below-freezing conditions (or a uniform temperature) and prevent the formation of ice dams.
Insulation
Insulation must be consistent throughout the entire attic space. You may need trusses with energy heels in new construction in order to obtain adequate insulation in the area between the top plate and the roof sheathing. Installing insulating foam with a high R-value per depth (the capacity of an insulating material to resist heat flow) may be necessary to assure consistent insulation R-value in some homes. The higher the R-value, the greater the insulating power.
You can apply a premium insulation system such as an open cell or closed cell spray foam to the lower surface of the roof sheathing and continuously from the wall insulation to the roof sheathing insulation. This prevents heat loss, thus maintaining more uniform temperatures on the roof.
Penetrations
All penetrations from the interior into the attic space — including light fixtures, fans, piping, ducts, and chimneys — should be tightly sealed with foam, caulking, or weather stripping. We also recommend using airtight light and fan fixtures in new construction.
Attic Ventilation
The attic ventilation system is very important for most typical insulation conditions. We recommend a continuous soffit vent system combined with a continuous ridge vent system. It also requires an air baffle between the top of the insulation and the bottom of the roof sheathing at eaves to ensure air flow. It’s worth noting that when spray foam insulation is applied to the lower surface of the roof sheathing, the attic becomes conditioned space, and ventilation is not required. The spray foam will maintain a uniform temperature on the roof surface, preventing ice dam formation in most conditions.
Secondary Roof System Components/Actions to Prevent Ice Dam Damage
Manufacturer’s literature would suggest that ice barriers be used anywhere there is potential for ice dam formation3. In addition, section R905.1.2 of the 2015 IRC Code4 indicates that “In areas where there has been a history of ice forming along the eaves causing a backup of water as designated in Table R301.2(1), an ice barrier shall be installed for asphalt shingles, metal roof shingles, mineral-surfaced roll roofing, slate and slate-type shingles, wood shingles and wood shakes.” Table R301.2(1) asks the jurisdiction to determine if there has been a history of ice forming along the eaves. Some local building codes in areas with freezing temperatures do not specifically require that ice barriers be installed. However, Quality Built still recommends they be installed in these conditions.
Section R905.1.2 of the 2015 IRC Code4 states that "an ice barrier shall consist of no fewer than two layers of underlayment cemented together, or a self-adhering polymer-modified bitumen sheet." Section R905.1.2 indicates that "the ice barrier is to extend from the lowest roof edge to a point 24 inches inside the exterior wall line of the building."
Where ice dams can form, the “recommended method is to use self-adhering modified bitumen membrane that complies with ASTM D 1970.”3 These recommendations extend to use in other areas. “Self-adhered eave and flashing membranes are also excellent for use on ridges, hips, flashings, and valleys as well as around dormers, skylights, and chimneys.”3
Quality Built recommends that in cold-to-freezing conditions, ice protection be provided in the following areas:
- Eaves
- Rakes
- Hips
- Ridges
- Confined Rakes (roof-to-wall)
- Beneath shingles in valleys
- Beneath shingles in fascia/soffit locations
- Areas below skylights and chimneys
- Entire roof areas that have a slope less than 4 inches per foot
Ice Protection
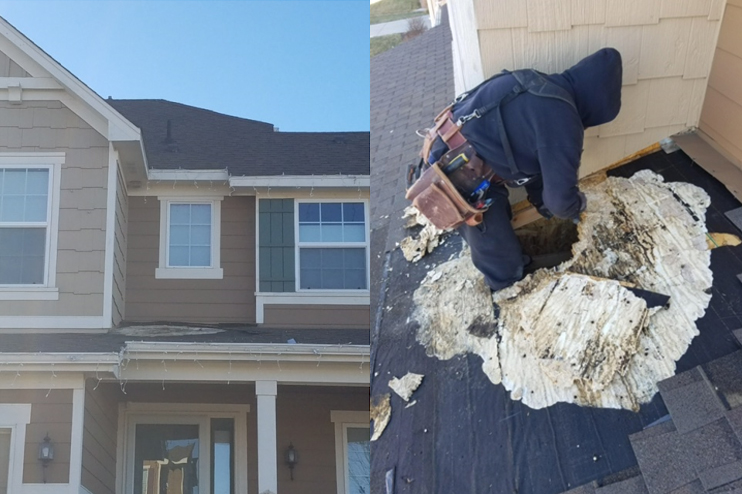
Special conditions can warrant the use of ice protection in specific roof areas (if not the entire roof). Areas with freezing temperatures and high snowfall may warrant ice protection in all roof areas. Local codes may dictate ice protections for the whole roof if the roof is asphalt shingle. Exhibit 1 presents a case when additional ice protection should be installed.
The home in Exhibit 1 is a typical two-story, midwestern home in a climate where freezing temperatures can occur. The builder made a cost-saving decision to not install a gutter on the upper roof section on the front of this north-facing home. Ice barriers had been installed in the code-required areas of this roof, but the roof of the front porch did not have ice barriers installed because it was not over a heated space and the slope was greater than 4 inches per foot. After several years, the homeowner noticed a significant deflection in the roof surface while installing Christmas lights. Upon investigation, it was discovered that ice dams had been forming on the cold porch roof from snow meltwater, which flowed from the warm second story roof.
This is a condition where at least one of two installations should have been made — installing gutters on the second story, or installing ice protection above the porch.
Other methods of ice dam prevention are available. Roof heating tapes can be effective but could be problematic in that they are prone to operation problems and require several additional roof penetrations for installation5. Additionally, they consume energy to correct an issue that is already caused by energy loss in the home. Manually removing snow from the roof can help prevent the formation of ice dams. However, this process is hazardous. We do not recommend it, as the removal of the ice often leads to damaged roof coverings, which in turn can lead to water damage.
Conclusion
Ice dams can cause significant damage. Ice dams form when melted snow refreezes, primarily at roof edges. The three essential elements for ice dam formation are snow, heat to melt the snow, and cold to refreeze the snow meltwater. A home constructed so that the roof temperature remains below freezing can prevent the formation of ice dams. A home that has good attic insulation has penetrations between the living space and attic space thoroughly sealed, and has good attic ventilation can maintain the roof surface at below-freezing conditions and prevent ice dam formation. Using ice barrier underlayment at eaves and other areas of the roof prone to ice dam formation should be used as a secondary system to prevent damage to the home.
A Technical Plan Review™ performed on your design documents using published best building practices will identify details that are weak and/or in conflict with codes or manufacturer’s specifications. Insulation, living space/attic separation, attic ventilation, and roof assembly details should be included in the plans to ensure proper installation. Checkpoints should be included in roof construction inspection templates to ensure the proper construction of assemblies that can prevent ice dam formation and/or damage from ice dams.
References
1Fisette, Paul (2011). Preventing Ice Dams. Retrieved from
https://bct.eco.umass.edu/publications/articles/preventing-ice-dams/
2Richard Stone (2018). Ice Dams. Retrieved from
https://www.extension.umn.edu/environment/housing-technology/moisture-management/ice-
3Owens Corning Roofers Guide (2016). Toledo, OH
4International Code Council (2015). International Building Code. Country Club Hills, Il: Publications.
https://up.codes/viewer/los_angeles/ca-residential-code-2016/chapter/9/roof-assemblies#R905.1.2
5Weil, Ben. Ice Dam Basics. Retrieved from
http://realestate.boston.com/home-improvement/2015/12/21/ice-dam-basics-how-to-prevent-
them-and-avoid-a-lot-of-costly-water-damage/